
马科斯·恩里克·达席尔瓦
Verified Expert in Engineering
Marcos has 17+ years in IT and development. 他的爱好包括REST架构、敏捷开发方法和JS.
Expertise
Years of Experience
12
Marcos has 17+ years in IT and development. 他的爱好包括REST架构、敏捷开发方法和JS.
12
At this point in our series on how to create a Node.. js REST API with Express.js and TypeScript, 我们已经构建了一个工作后端,并将我们的代码分离到路由配置中, services, middleware, controllers, and models. 如果你准备好从那里开始,克隆 the example repo and run Git checkout total -article 02.
在这第三篇也是最后一篇文章中,我们将通过添加以下内容继续开发REST API:
Along the way, we’ll add validation and security libraries, 获得一些使用Docker的经验, 并提出几个进一步的主题, libraries, 以及读者在构建和扩展自己的REST api时应该学习的技能.
让我们首先用一个真实的数据库替换上一篇文章中的内存数据库.
要创建用于开发的本地数据库,我们可以在本地安装MongoDB. 但是环境(操作系统发行版和版本)之间的差异, 例如)会带来问题. To avoid this, 我们将利用这个机会来利用一个行业标准工具:Docker容器.
The only thing readers need to do is install Docker and then install Docker Compose. 安装完成后,开始运行 docker -v 应该生成Docker版本号.
现在,为了运行MongoDB,我们将在项目的根目录下创建一个名为 docker-compose.yml 载有下列内容:
version: '3'
services:
  mongo:
    image: mongo
    volumes:
      - ./data:/data/db
    ports:
      - "27017:27017"
Docker Compose允许我们使用一个配置文件同时运行多个容器. 在本文的最后, 我们也会看看在Docker中运行REST API后端, but for now, 我们将使用它来运行MongoDB,而无需在本地安装它:
Sudo docker-compose up -d
The up 命令将启动定义的容器,监听MongoDB的标准端口27017. The -d Switch将从终端中分离命令. 如果一切正常运行,我们应该看到这样的消息:
使用默认驱动程序创建网络"toptal-rest-series_default"
创建toptal-rest-series_mongo_1 ... done
它还将创造一个新的 data 目录,所以我们应该添加一个 data line in .gitignore.
现在,如果我们需要关闭MongoDB Docker容器,我们只需要运行 Sudo docker-compose down and we should see the following output:
停止toptal-rest-series_mongo_1 ... done
删除toptal-rest-series_mongo_1 ... done
Removing network toptal-rest-series_default
这就是我们启动Node所需要知道的一切.. js/MongoDB REST API后端. 确保我们用过 Sudo docker-compose up -d so MongoDB is ready for our app to use.
为了与MongoDB通信,我们的后端将利用一个对象 data modeling (ODM) library called Mongoose. 虽然Mongoose很容易使用,但值得一试 documentation 学习它为现实世界的项目提供的所有高级可能性.
To install Mongoose, we use the following:
npm i mongoose
让我们配置一个Mongoose服务来管理到MongoDB实例的连接. 由于此服务可以在多个资源之间共享,因此我们将其添加到 common folder of our project.
The configuration is straightforward. 虽然没有严格要求,但我们会有一个 mongooseOptions 对象来自定义以下内容 猫鼬连接选项:
useNewUrlParser: Without this set to true, Mongoose prints a deprecation warning.useUnifiedTopology: Mongoose文档建议将其设置为 true 使用较新的连接管理引擎.serverSelectionTimeoutMS:用于本演示项目的用户体验, 比默认的30秒更短的时间意味着任何忘记在Node之前启动MongoDB的读者.Js将很快看到有用的反馈,而不是一个明显无响应的后端.useFindAndModify: Setting this to false 也避免了弃用警告,但在 deprecations section 而不是在Mongoose连接选项中. More specifically, 这导致Mongoose使用较新的本机MongoDB功能,而不是旧的Mongoose shim.将这些选项与一些初始化和重试逻辑结合起来,这是最后一个 常见的/服务/猫鼬.service.ts file:
从'mongoose'输入猫鼬;
从'debug'中导入debug;

const log: debug.IDebugger = debug('app:mongoose-service');

类MongooseService {
    private count = 0;
    private mongooseOptions = {
        useNewUrlParser: true,
        useUnifiedTopology:没错,
        serverSelectionTimeoutMS: 5000,
        useFindAndModify:假的,
    };

    constructor() {
        this.connectWithRetry();
    }

    getMongoose() {
        return mongoose;
    }

    connectWithRetry = () => {
        log('尝试连接MongoDB(如果需要将重试)');
        mongoose
            .连接(“mongodb: / / localhost: 27017 / api-db’,这一点.mongooseOptions)
            .then(() => {
                log('MongoDB已连接');
            })
            .catch((err) => {
                const retrySeconds = 5;
                log(
                    ' MongoDB连接失败(将重试#${++this
                        .count} after ${retrySeconds} seconds):`,
                    err
                );
                setTimeout(this.connectWithRetry, retrySeconds * 1000);
            });
    };
}
export default new MongooseService();
一定要把两者的区别弄清楚 connect() 从猫鼬和我们自己的功能 connectWithRetry() service function:
mongoose.connect() 尝试连接到我们的本地MongoDB服务(运行与 docker-compose),之后会暂停 serverSelectionTimeoutMS milliseconds.MongooseService.connectWithRetry() 如果我们的应用程序启动,但MongoDB服务尚未运行,则重试上述操作. Since it’s in a singleton constructor, connectWithRetry() 将只运行一次,但它将重试 connect() 无限的呼唤,伴随着停顿 retrySeconds 超时时的秒数.下一步是用MongoDB替换之前的内存数据库!
Previously, 我们使用了内存数据库,使我们能够专注于我们正在构建的其他模块. 要使用Mongoose,我们必须完全重构 users.dao.ts. We’ll need one more import statement, to start:
导入mongooseService../../共同/服务/猫鼬.service';
Now let’s remove everything from the UsersDao class definition except the constructor. 我们可以通过创建用户来重新填充它 Schema for Mongoose before the constructor:
Schema = mongooseService.getMongoose().Schema;

userSchema = new this.Schema({
    _id: String,
    email: String,
    password: { type: String, select: false },
    firstName: String,
    lastName: String,
    permissionFlags:数量,
}, { id: false });

User = mongooseService.getMongoose().model('Users', this.userSchema);
这定义了我们的MongoDB集合,并添加了一个我们的内存数据库没有的特殊特性: select: false in the password 字段将在获取用户或列出所有用户时隐藏此字段.
我们的用户模式看起来很熟悉,因为它类似于我们的DTO实体. 主要区别在于我们定义了哪些字段应该存在于我们的MongoDB集合中 Users,而DTO实体则定义在HTTP请求中接受哪些字段.
我们方法的这一部分没有改变,因此仍然在顶部导入我们的三个dto users.dao.ts. 但是在实现CRUD方法操作之前,我们将以两种方式更新dto.
id vs. _id
Because Mongoose automatically makes an _id 字段可用,我们将删除 id field from the DTOs. 它将来自路由请求的参数.
注意,Mongoose模型提供了一个虚拟的 id getter by default, so we’ve disabled that option above with { id: false } to avoid confusion. 但这打破了我们的参考 user.id in our user middleware validateSameEmailBelongToSameUser ()—we need user._id there instead.
一些数据库使用该约定 id, and others use _id,所以没有完美的界面. For our example project using Mongoose, 我们只是注意在代码的哪个点使用哪个, 但这种不匹配仍然会暴露给API消费者:
我们把它留给读者作为练习来实现其中的一个 可用的实际解决方案 在项目结束时.
We’ll also rename permissionLevel to permissionFlags 以反映我们将实现的更复杂的权限系统, 以及上述猫鼬 userSchema definition.
Remember, DTO只包含我们希望在API客户机和数据库之间传递的字段. 这可能看起来很不幸,因为模型和dto之间有一些重叠,但要注意不要以“默认安全性”为代价过多地推动DRY.如果添加一个字段只需要在一个地方添加, 开发人员可能会无意中在API中公开它,而它本来只是内部的. 这是因为该流程不会强迫他们将数据存储和数据传输视为两个独立的上下文,具有两组可能不同的需求.
完成DTO更改后,我们可以实现CRUD方法操作(在 UsersDao 构造函数),从 create:
async addUser(userFields: CreateUserDto) {
    const userId = shortid.generate();
    const user = new this.User({
        _id: userId,
        ...userFields,
        permissionFlags: 1,
    });
    await user.save();
    return userId;
}
请注意,无论API使用者发送的目的是什么 permissionFlags via userFields, we then override it with the value 1.
Next we have read,通过ID获取用户,通过电子邮件获取用户,并通过分页列出用户的基本功能:
async getUserByEmail(email: string) {
    return this.User.findOne({email: email}).exec();
}

async getUserById(userId: string) {
    return this.User.findOne({_id: userId}).populate('User').exec();
}

async getUsers(limit = 25, page = 0) {
    return this.User.find()
        .limit(limit)
        .skip(limit * page)
        .exec();
}
To update 对于用户来说,一个DAO函数就足够了,因为底层的Mongoose findOneAndUpdate() 函数可以更新整个文档或只是其中的一部分. Note that our own function will take userFields as either a PatchUserDto or a PutUserDto, using a TypeScript union type (signified by |):
async updateUserById(
    userId: string,
    userFields: PatchUserDto | PutUserDto
) {
    const existingUser =等待这个.User.findOneAndUpdate(
        { _id: userId },
        { $set: userFields },
        { new: true }
    ).exec();

    return existingUser;
}
The new: true 选项告诉Mongoose返回更新后的对象, rather than how it originally had been.
Delete 与猫鼬简洁:
async removeUserById(userId: string) {
    return this.User.deleteOne({_id: userId}).exec();
}
读者可能会注意到,每个调用 User 成员函数链接到 exec() call. This is optional, 但Mongoose开发人员推荐它,因为它在调试时提供了更好的堆栈跟踪.
编写完DAO之后,我们需要稍微更新一下 users.service.ts 来匹配我们上一篇文章中的新函数. 不需要进行大的重构,只需要做三个补充:
@@ -16,3 +16,3 @@类UsersService实现CRUD {
     async list(limit: number, page: number) {
-返回UsersDao.getUsers();
+返回UsersDao.getUsers(limit, page);
     }
@@ -20,3 +20,3 @@类UsersService实现CRUD {
     async patchById(id: string, resource: PatchUserDto): Promise {
-返回UsersDao.patchUserById (id、资源);
+返回UsersDao.updateUserById (id、资源);
     }
@@ -24,3 +24,3 @@类UsersService实现CRUD {
     async putById(id: string, resource: PutUserDto): Promise {
-返回UsersDao.putUserById (id、资源);
+返回UsersDao.updateUserById (id、资源);
     }
大多数函数调用保持完全相同,因为当我们重构 UsersDao,我们维护了在上一篇文章中创建的结构. But why the exceptions?
updateUserById() for both PUT and PATCH as we hinted at above. (As mentioned in Part 2, 我们遵循典型的REST API实现,而不是试图遵循 具体的rfc. Among other things, this means not having PUT requests create new entities if they don’t exist; this way, 我们的后端不会把ID生成的控制权交给API消费者.)limit and page parameters along to getUsers() 因为我们的新DAO实现将使用它们.这里的主要结构是一个相当健壮的模式. For instance, 如果开发人员想要将Mongoose和MongoDB换成像TypeORM和PostgreSQL这样的东西,它可以被重用. As above, 这种替换只需要重构DAO的各个函数,同时维护它们的签名以匹配其余代码.
让我们启动API后端 npm start. 然后我们将尝试创建一个用户:
curl——request POST 'localhost:3000/users' \
——header 'Content-Type: application/json' \
--data-raw '{
    "password":"secr3tPass!23",
    "email":"marcos.henrique@ngskmc-eis.net"
}'
响应对象包含一个新的用户ID:
{
    "id": "7WYQoVZ3E"
}
与前一篇文章中一样,使用环境变量将使剩余的手动测试更容易:
REST_API_EXAMPLE_ID="put_your_id_here"
更新用户看起来像这样:
curl——include——request PATCH "localhost:3000/users/$REST_API_EXAMPLE_ID" \
——header 'Content-Type: application/json' \
--data-raw '{
    "firstName": "Marcos",
    "lastName": "Silva"
}'
回应应该从 HTTP/1.1 204 No Content. (Without the --include 切换时,没有响应就会打印出来,这是符合我们的实现的.)
如果我们现在让用户检查上面的更新…
curl——request GET“localhost:3000/users/$REST_API_EXAMPLE_ID”\
——header 'Content-Type: application/json' \
--data-raw '{
    "firstName": "Marcos",
    "lastName": "Silva"
}'
响应显示预期的字段,包括 _id field discussed above:
{
    "_id": "7WYQoVZ3E",
    "email": "marcos.henrique@ngskmc-eis.net",
    "permissionFlags": 1,
    "__v": 0,
    "firstName": "Marcos",
    "lastName": "Silva"
}
还有一个特殊的领域, __v, used by Mongoose for versioning; it will be incremented each time this record is updated.
接下来,让我们列出用户:
curl——request GET 'localhost:3000/users' \
--header 'Content-Type: application/json'
预期的响应是相同的,只是包装在 [].
现在我们的密码已经被安全地存储了,让我们来确保可以删除用户:
curl——include——request DELETE“localhost:3000/users/$REST_API_EXAMPLE_ID”\
--header 'Content-Type: application/json'
我们预计会再次收到204的回复.
读者可能想知道密码字段是否正常工作,因为我们的 select: false in the Mongoose Schema 定义隐藏了它 GET output as intended. 我们重复一下我们的开头 POST 要再次创建用户,请选中. (Don’t forget to store the new ID for later.)
检查密码是否已安全储存(例如.e.(散列,而不是纯文本),开发人员可以直接检查MongoDB数据. 一种方法是访问标准 mongo 从运行的Docker容器内的CLI客户端:
命令docker执行命令-它的total -rest-series_mongo_1
From there, executing use api-db followed by db.users.find().pretty() 会列出所有用户数据,包括密码吗.
那些喜欢GUI的人可以安装一个单独的MongoDB客户端,像 Robo 3T:

The password prefix ($argon2...) is part of the PHC string format, 如果黑客设法窃取了数据库,那么提到Argon2及其一般参数的事实将无法帮助他们确定原始密码. 存储的密码可以进一步加强使用 salting, a technique we’ll use below with JWTs. 当两个用户输入相同的密码时,存储值之间的差异将留给读者作为练习.
现在我们知道Mongoose成功地将数据发送到MongoDB数据库. 但是我们怎么知道我们的API消费者将在他们的请求中向我们的用户路由发送适当的数据呢?
有几种方法可以完成字段验证. 在本文中,我们将使用express-validator, which is quite stable, easy to use, 并且有完整的记录. 虽然我们可以使用验证功能 那是猫鼬的express-validator提供了额外的特性. For example, 它附带了一个开箱即用的电子邮件地址验证器, 在Mongoose中需要我们编写一个自定义验证器吗.
Let’s install it:
npm i express-validator
要设置要验证的字段,我们将使用 body() 方法,我们将在 users.routes.config.ts. The body() 方法将验证字段并生成错误列表(存储在 express.Request 失败情况下的对象.
然后,我们需要自己的中间件来检查和使用错误列表. 由于这个逻辑对于不同的路由可能以相同的方式工作,让我们创建 common/middleware/body.validation.middleware.ts with the following:
从“express”中输入express;
从“express-validator”中导入{validationResult};

类BodyValidationMiddleware {
    verifyBodyFieldsErrors(
        req: express.Request,
        res: express.Response,
        next: express.NextFunction
    ) {
        const errors = validationResult(req);
        if (!errors.isEmpty()) {
            return res.status(400).send({ errors: errors.array() });
        }
        next();
    }
}

导出默认的新的BodyValidationMiddleware();
方法生成的任何错误都可以处理 body() function. 让我们重新添加以下内容 users.routes.config.ts:
import BodyValidationMiddleware from '../共同/中间件/身体.validation.middleware';
import { body } from 'express-validator';
现在我们可以用下面的代码更新我们的路由:
@@ -15,3 +17,6 @@导出类UsersRoutes扩展CommonRoutesConfig {
             .post(
-                UsersMiddleware.validateRequiredUserBodyFields,
+                身体(电子邮件).isEmail(),
+                身体(密码)
+                    .isLength({ min: 5 })
+                    .withMessage('必须包含密码(5+字符)'),
+                BodyValidationMiddleware.verifyBodyFieldsErrors,
                 UsersMiddleware.validateSameEmailDoesntExist,
@@ -28,3 +33,10 @@导出类UsersRoutes扩展CommonRoutesConfig {
         this.app.把(/用户/:userId, [
-            UsersMiddleware.validateRequiredUserBodyFields,
+            身体(电子邮件).isEmail(),
+            身体(密码)
+                .isLength({ min: 5 })
+                .withMessage('必须包含密码(5+字符)'),
+            身体(“firstName”).isString(),
+            身体(姓).isString(),
+            body('permissionFlags').isInt(),
+            BodyValidationMiddleware.verifyBodyFieldsErrors,
             UsersMiddleware.validateSameEmailBelongToSameUser,
@@ -34,2 +46,11 @@导出类UsersRoutes扩展CommonRoutesConfig {
         this.app.补丁(/用户/:userId, [
+            身体(电子邮件).isEmail().optional(),
+            身体(密码)
+                .isLength({ min: 5 })
+                .withMessage('密码必须是5+字符')
+                .optional(),
+            身体(“firstName”).isString().optional(),
+            身体(姓).isString().optional(),
+            body('permissionFlags').isInt().optional(),
+            BodyValidationMiddleware.verifyBodyFieldsErrors,
             UsersMiddleware.validatePatchEmail,
Be sure to add BodyValidationMiddleware.verifyBodyFieldsErrors 在每条路线之后 body() 行,否则它们都不会产生影响.
注意我们是如何更新的 POST and PUT 使用express-validator而不是我们自己开发的 validateRequiredUserBodyFields function. 由于这些路由是唯一使用此函数的路由,因此可以从 users.middleware.ts.
That’s it! 读取器可以重启Node.使用他们最喜欢的REST客户端来测试结果,看看它是如何处理各种输入的. 不要忘记探索express验证器 documentation for further possibilities; our example is just a starting point for request validation.
Valid data is one aspect to ensure; valid users and actions are another.
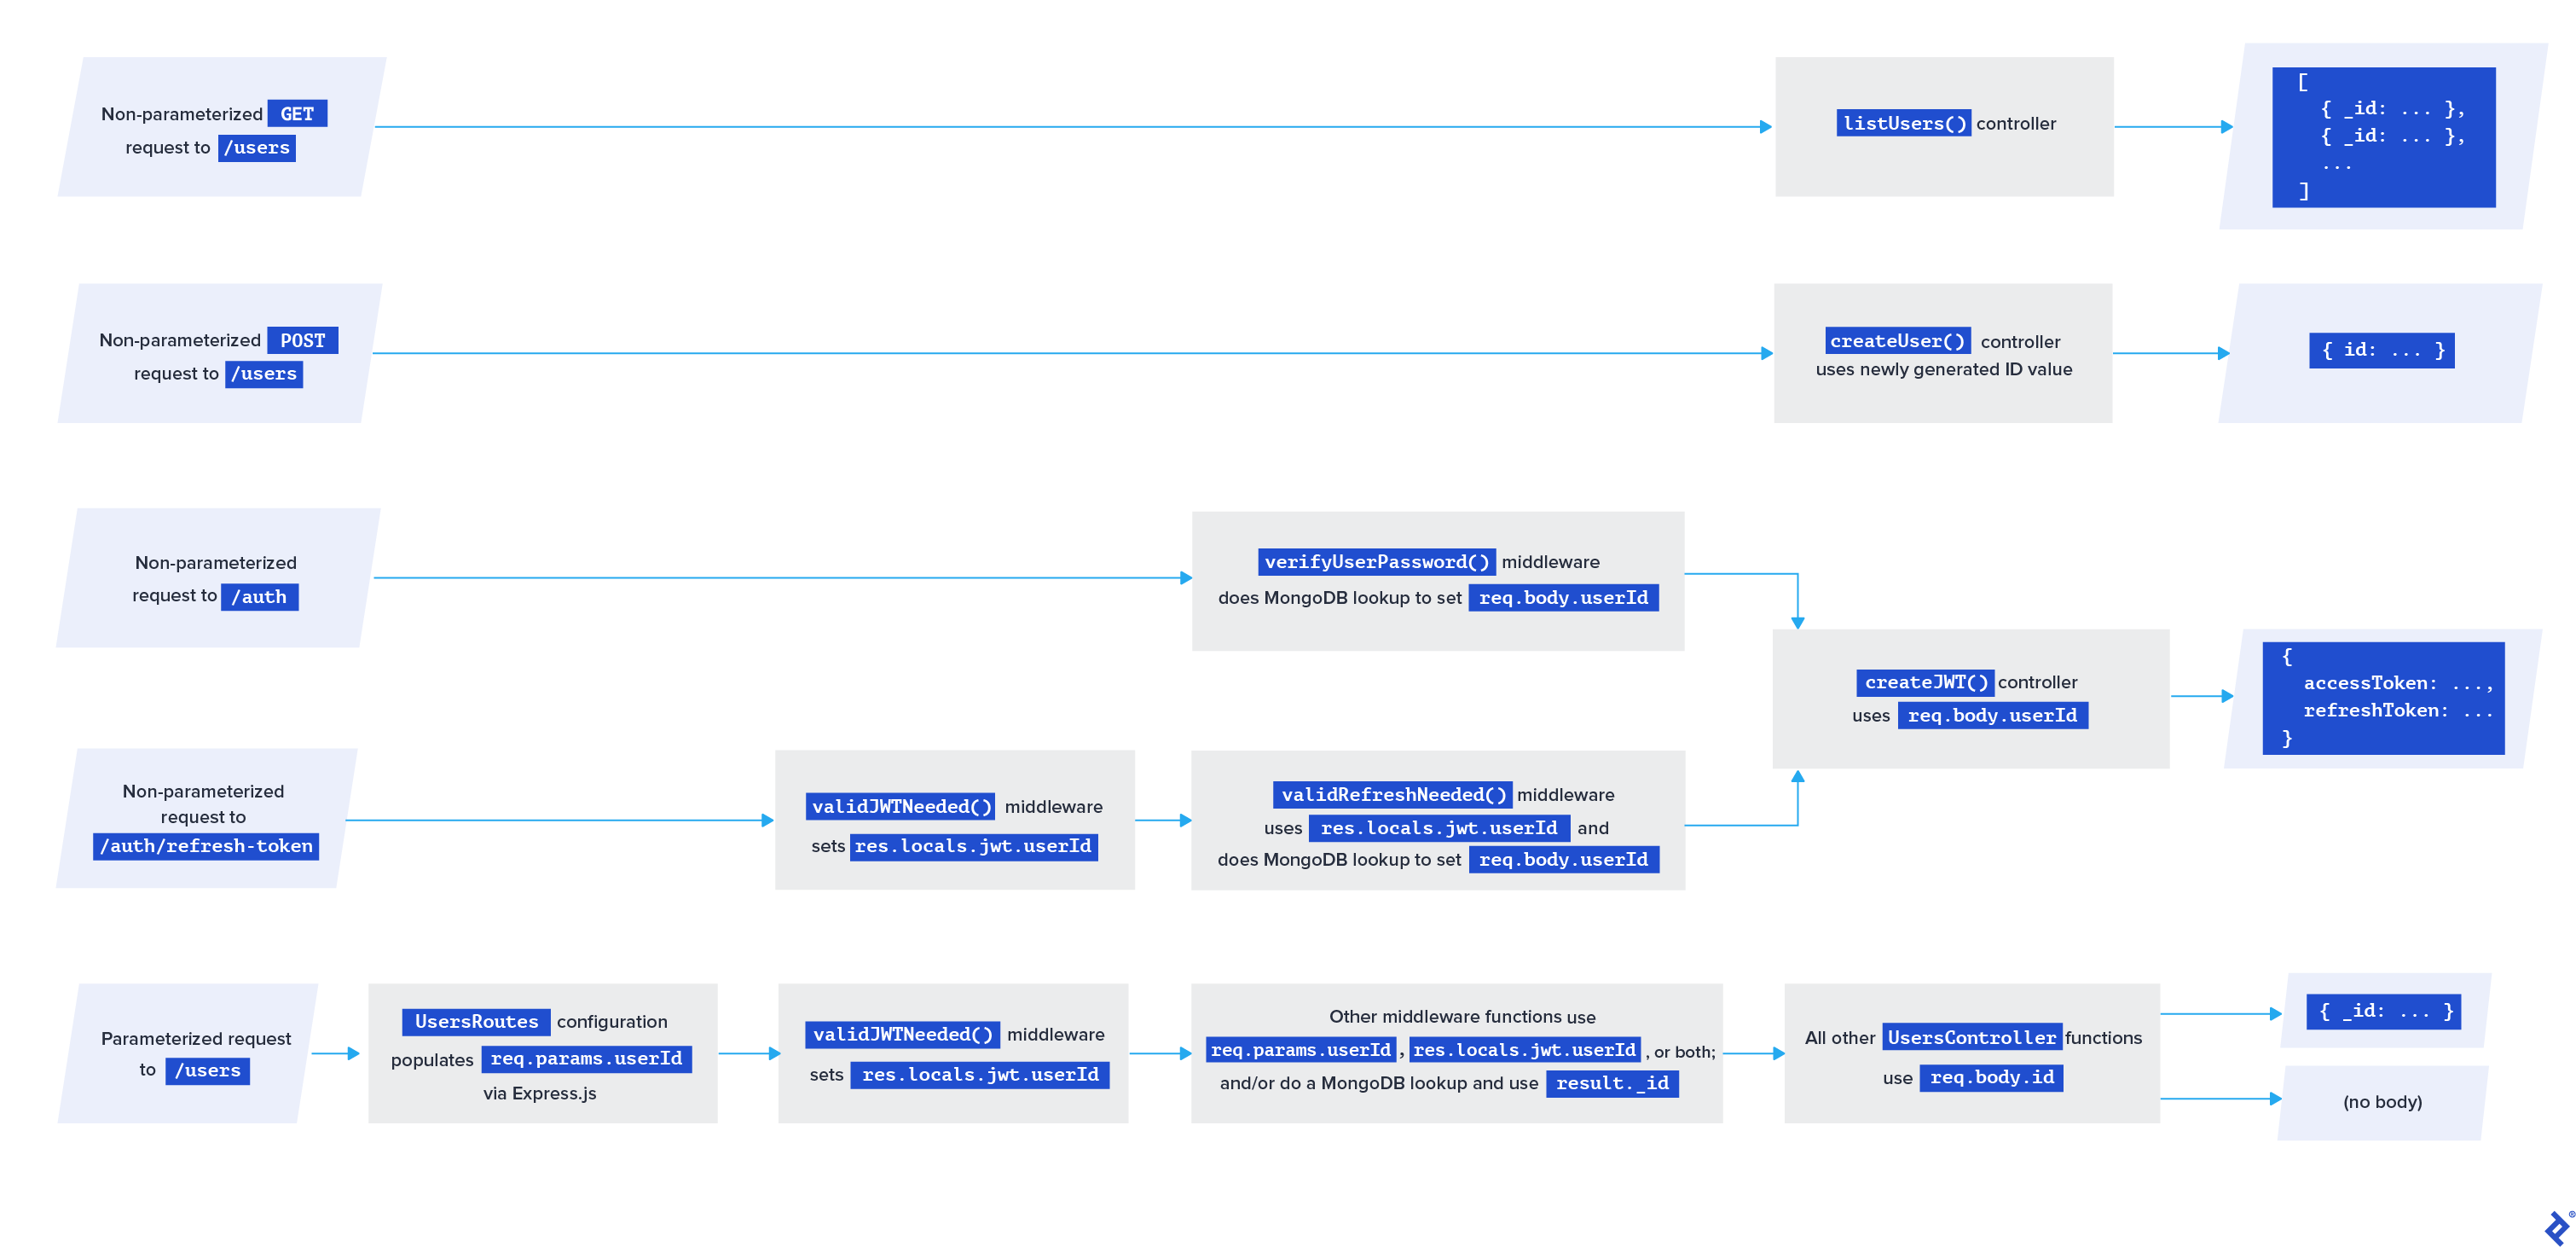
Our Node.Js应用程序公开了一套完整的 users/ 端点,允许API使用者创建、更新和列出用户. 但是每个端点都允许无限制的公共访问. 这是一种常见的模式,可以防止用户更改彼此的数据,防止外部人员访问我们不希望公开的任何端点.
这些限制涉及两个主要方面,它们都可以缩写为“授权”.” Authentication is about who the request is from and authorization 是关于他们是否被允许做他们所要求的. 重要的是要知道正在讨论的是哪一个. 即使没有简短的形式,标准的HTTP响应代码 设法混淆这个问题: 401 Unauthorized 是关于认证和 403 Forbidden is about authorization. 在模块名中,我们宁可让“auth”代表“authentication”, 并且使用“许可”来表示授权事项.
即使没有简短的表单,标准HTTP响应代码也会混淆这个问题:
401 Unauthorized是关于认证和403 Forbiddenis about authorization.
有很多身份验证方法需要探索, 包括像Auth0这样的第三方身份提供商. 在本文中,我们选择了一个基本但可扩展的实现. It’s based on JWTs.
JWT由加密的JSON和一些与身份验证无关的元数据组成, 在我们的例子中包括用户的电子邮件地址和权限标志. JSON还将包含一个秘密,用于验证元数据的完整性.
其思想是要求客户端在每个非公共请求中发送一个有效的JWT. 这让我们可以验证客户端最近是否拥有想要使用的端点的有效凭据, 而不必在每个请求中通过网络发送凭据本身.
但是,这在我们的示例API代码库中适合哪里呢? 简单:我们可以在我们的路由配置中使用中间件!
让我们首先配置jwt中的内容. 这里我们将开始使用 permissionFlags 字段,但这只是因为它方便在jwt中加密元数据,而不是因为jwt本身与细粒度权限逻辑有任何关系.
在创建jwt生成中间件之前,我们需要添加一个特殊的函数 users.dao.ts 检索密码字段,因为我们将Mongoose设置为通常避免检索密码字段:
async getUserByEmailWithPassword (email: string) {
    return this.User.findOne({email: email})
        .select('_id email permissionFlags +password')
        .exec();
}
And in the users.service.ts:
async getUserByEmailWithPassword (email: string) {
    return UsersDao.getUserByEmailWithPassword (电子邮件);
}
Now, let’s create an auth 文件夹——我们将添加一个端点,以允许API使用者生成jwt. 首先,让我们为它创建一个中间件 auth/middleware/auth.middleware.ts, as a singleton called AuthMiddleware.
We’ll need some imports:
从“express”中输入express;
导入usersService../../users/services/users.service';
从'argon2'导入* as argon2;
In the AuthMiddleware class, 我们将创建一个中间件函数来检查API用户是否在其请求中包含了有效的登录凭据:
异步verifyUserPassword (
    req: express.Request,
    res: express.Response,
    next: express.NextFunction
) {
    const user: any = await usersService.getUserByEmailWithPassword (
        req.body.email
    );
    if (user) {
        const passwordHash = user.password;
        if (await argon2.验证(passwordHash点播.body.password)) {
            req.body = {
                userId: user._id,
                email: user.email,
                permissionFlags: user.permissionFlags,
            };
            return next();
        }
    }
    // Giving the same message in both cases
    //帮助防止破解尝试:
    res.status(400).send({errors:['无效电子邮件和/或密码']});
}
至于中间件要保证 email and password exist in req.body,我们将在稍后配置路由时使用express-validator verifyUserPassword() function.
To generate a JWT, 我们需要一个JWT秘密, 我们将使用它来对生成的jwt进行签名,并验证来自客户机请求的传入jwt. 而不是在TypeScript文件中硬编码JWT秘密的值, 我们将把它存储在一个单独的“环境变量”文件中, .env, which should never be pushed to a code repository.
As is common practice, we’ve added an .env.example 文件到repo中,以帮助开发人员了解在创建真正的 .env. In our case, we want a variable called JWT_SECRET 将JWT秘密存储为字符串. 等到本文结束并使用repo的最后一个分支的读者需要这样做 remember to change these values locally.
现实世界的项目尤其需要跟进 JWT best practices by 根据环境区分JWT秘密 (开发、准备、制作等.).
Our .env 文件(在项目的根目录下)必须使用以下格式,但不应该保留相同的秘密值:
JWT_SECRET=My!@!Se3cr8tH4sh3
将这些变量加载到应用程序的一个简单方法是使用一个名为dotenv的库:
npm i dotenv
惟一需要的配置是调用 dotenv.config() 函数,只要我们启动应用程序. At the very top of app.ts, we’ll add:
从'dotenv'导入dotenv;
const dotenvResult = dotenv.config();
if (dotenvResult.error) {
    throw dotenvResult.error;
}
生成JWT的最后一个先决条件是安装jsonwebtoken库和它的TypeScript类型:
npm i jsonwebtoken
npm i --save-dev @types/jsonwebtoken
Now, let’s create the /auth controller at auth/controllers/auth.controller.ts. 我们不需要导入dotenv库,因为导入它 app.ts 的内容 .env 文件可通过Node在整个应用程序中获得.js global object called process:
从“express”中输入express;
从'debug'中导入debug;
从'jsonwebtoken'导入JWT;
从'crypto'导入crypto;

const log: debug.IDebugger = debug('app:auth-controller');

/**
*该值自动从 .Env,一个你将拥有的文件
*在项目的根部为自己创建.
*
* See .env.example in the repo for the required format.
*/
// @ts-expect-error
const jwtSecret: string = process.env.JWT_SECRET;
const tokenExpirationInSeconds = 36000;

class AuthController {
    异步创建jwt (req: express.Request, res: express.Response) {
        try {
            const refreshId = req.body.userId + jwtSecret;
            const salt = crypto.createSecretKey(crypto.randomBytes(16));
            const hash = crypto
                .createHmac(“sha512”、盐)
                .update(refreshId)
                .digest('base64');
            req.body.refreshKey = salt.export();
            const token = jwt.sign(req.body, jwtSecret, {
                expiresIn: tokenExpirationInSeconds,
            });
            return res
                .status(201)
                .send({accessToken: token, refreshToken: hash});
        } catch (err) {
            log('createJWT错误:%O', err);
            return res.status(500).send();
        }
    }
}

export default new AuthController();
jsonwebtoken库将使用我们的 jwtSecret. 我们还将使用Node生成一个盐和一个散列.js-native crypto 模块,然后使用它们来创建 refreshToken API消费者可以用它来刷新当前的jwt——这种设置对于应用程序来说是特别好的 be able to scale.
两者有什么区别 refreshKey, refreshToken, and accessToken? The *Token发送给我们的API消费者的想法是 accessToken 用于任何超出公众可用范围的请求,并且 refreshToken 用于申请更换过期的产品 accessToken. The refreshKey, on the other hand, is used to pass the salt 变量加密 refreshToken回到我们的刷新中间件,我们将在下面讨论.
注意,我们的实现让jsonwebtoken为我们处理令牌过期. 如果JWT过期,客户端将需要再次进行身份验证.
现在让我们配置端点 auth/auth.routes.config.ts:
import { CommonRoutesConfig } from '../common/common.routes.config';
导入authController./controllers/auth.controller';
导入authMiddleware./middleware/auth.middleware';
从“express”中输入express;
import BodyValidationMiddleware from '../共同/中间件/身体.validation.middleware';
import { body } from 'express-validator';

导出类AuthRoutes扩展CommonRoutesConfig {
    构造函数(app:表达.Application) {
        超级(应用,“AuthRoutes”);
    }

    configureRoutes():表达.Application {
        this.app.post(`/auth`, [
            body('email').isEmail(),
            body('password').isString(),
            BodyValidationMiddleware.verifyBodyFieldsErrors,
            authMiddleware.verifyUserPassword,
            authController.createJWT,
        ]);
        return this.app;
    }
}
别忘了把它加到我们的 app.ts file:
// ...
导入{AuthRoutes}./auth/auth.routes.config';
// ...
routes.push(new AuthRoutes(app)); // independent: can go before or after UsersRoute
// ...
我们已经准备好重新启动Node.Js和现在测试,确保我们匹配我们之前用来创建测试用户的任何凭据:
curl——request POST 'localhost:3000/auth' \
——header 'Content-Type: application/json' \
--data-raw '{
    "password":"secr3tPass!23",
    "email":"marcos.henrique@ngskmc-eis.net"
}'
The response will be something like:
{
    :“accessToken eyJhbGciOiJIUzI1NiIsInR5cCI6IkpXVCJ9.eyJ1c2VySWQiOiJVZGdzUTBYMXciLCJlbWFpbCI6Im1hcmNvcy5oZW5yaXF1ZUB0b3B0YWwuY29tIiwicHJvdmlkZXIiOiJlbWFpbCIsInBlcm1pc3Npb25MZXZlbCI6MSwicmVmcmVzaEtleSI6ImtDN3JFdDFHUmNsWTVXM0N4dE9nSFE9PSIsImlhdCI6MTYxMTM0NTYzNiwiZXhwIjoxNjExMzgxNjM2fQ.cfI_Ey4RHKbOKFdVGsowePZlMeX3fku6WHFu0EMjFP8”,
    :“refreshToken cXBHZ2tJdUhucERaTVpMWVNTckhNenQwcy9Bd0VIQ2RXRnA4bVBJbTBuQVorcS9Qb2xOUDVFS2xEM1RyNm1vTGdoWWJqb2xtQ0NHcXhlWERUcG81d0E9PQ = = "
}
和之前一样,为了方便起见,让我们使用上面的值设置一些环境变量:
REST_API_EXAMPLE_ACCESS = " put_your_access_token_here "
REST_API_EXAMPLE_REFRESH = " put_your_refresh_token_here "
Great! 我们有访问令牌和刷新令牌, 但是我们需要一些中间件来处理它们.
我们需要一个新的TypeScript类型来处理JWT结构的解码形式. Create common/types/jwt.ts with this in it:
export type Jwt = {
    refreshKey: string;
    userId: string;
    permissionFlags:字符串;
};
让我们实现中间件函数来检查是否存在刷新令牌, 验证刷新令牌, and to verify a JWT. 这三个都可以放到一个新文件里, auth/middleware/jwt.middleware.ts:
从“express”中输入express;
从'jsonwebtoken'导入JWT;
从'crypto'导入crypto;
import { Jwt } from '../../common/types/jwt';
导入usersService../../users/services/users.service';

// @ts-expect-error
const jwtSecret: string = process.env.JWT_SECRET;

class JwtMiddleware {
    verifyRefreshBodyField(
        req: express.Request,
        res: express.Response,
        next: express.NextFunction
    ) {
        if (req.body && req.body.refreshToken) {
            return next();
        } else {
            return res
                .status(400)
                .send({errors: ['Missing required field: refreshToken']});
        }
    }

    异步validRefreshNeeded (
        req: express.Request,
        res: express.Response,
        next: express.NextFunction
    ) {
        const user: any = await usersService.getUserByEmailWithPassword (
            res.locals.jwt.email
        );
        const salt = crypto.createSecretKey(
            Buffer.from(res.locals.jwt.refreshKey.data)
        );
        const hash = crypto
            .createHmac(“sha512”、盐)
            .update(res.locals.jwt.userId + jwtSecret)
            .digest('base64');
        if (hash === req.body.refreshToken) {
            req.body = {
                userId: user._id,
                email: user.email,
                permissionFlags: user.permissionFlags,
            };
            return next();
        } else {
            return res.status(400).send({errors:['无效的刷新令牌']});
        }
    }

    validJWTNeeded(
        req: express.Request,
        res: express.Response,
        next: express.NextFunction
    ) {
        if (req.标题(“授权”)){
            try {
                Const authorization = req.标题(“授权”).split(' ');
                if (authorization[0] !== 'Bearer') {
                    return res.status(401).send();
                } else {
                    res.locals.jwt = jwt.verify(
                        authorization[1],
                        jwtSecret
                    ) as Jwt;
                    next();
                }
            } catch (err) {
                return res.status(403).send();
            }
        } else {
            return res.status(401).send();
        }
    }
}

export default new JwtMiddleware();
The validRefreshNeeded() 函数还验证刷新令牌对于特定用户ID是否正确. 如果是,那么下面我们将重用 authController.createJWT 为用户生成新的JWT.
We also have validJWTNeeded(),它验证API使用者是否在HTTP头中发送了一个有效的JWT convention Authorization: Bearer . (是的,这是另一个不幸的“auth”混淆.)
现在配置一个新路由来刷新令牌和其中编码的权限标志.
In auth.routes.config.ts 我们将导入新的中间件:
导入jwtMiddleware./middleware/jwt.middleware';
然后我们将添加以下路由:
this.app.邮报》(' /认证/ refresh-token ',
    jwtMiddleware.validJWTNeeded,
    jwtMiddleware.verifyRefreshBodyField,
    jwtMiddleware.validRefreshNeeded,
    authController.createJWT,
]);
现在我们可以测试它是否可以正常工作 accessToken and refreshToken we received earlier:
curl——request POST 'localhost:3000/auth/refresh-token' \
——header 'Content-Type: application/json' \
——header "Authorization: Bearer $REST_API_EXAMPLE_ACCESS" \
--data-raw "{
    REST_API_EXAMPLE_REFRESH美元\“refreshToken \”,\“\”
}"
我们应该会收到一份新的 accessToken and a new refreshToken to be used later. 我们把它留给读者作为练习,以确保后端使以前的令牌无效,并限制新令牌的请求频率.
现在,我们的API使用者能够创建、验证和刷新jwt. Let’s look at some permissions concepts, 然后实现一个,并将其与用户路由中的JWT中间件集成.
一旦我们知道API客户端是谁, 我们想知道他们是否被允许使用他们所请求的资源. 管理每个用户的权限组合是很常见的. 不增加太多复杂性, 这比传统的“访问级”策略具有更大的灵活性. 不管我们对每个权限使用的业务逻辑是什么, 创建处理它的通用方法非常简单.
&) and Powers of Two为了管理权限,我们将利用JavaScript的内置功能 bitwise AND operator, &. 这种方法使我们能够将一整套权限信息存储为单个信息, per-user number, 它的每个二进制数字表示用户是否有权限做某事. 但是没有必要过于担心它背后的数学问题——关键是它很容易使用.
我们所需要做的就是定义每一种权限(一个权限) flag) as a power of 2 (1, 2, 4, 8, 16, 32, …). 然后我们可以将业务逻辑附加到每个标志上,最多31个标志. 例如,一个音频可访问的国际博客可能具有以下权限:
这种方法允许用户使用各种权限标志组合:
读者可以用纯JavaScript测试这个逻辑:
Input: 5 & 1
Output: 1
Input: 1 & 4
Output: 0
Input: 12 & 4
Output: 4
When the output is 0, we block the user; otherwise, 我们允许他们访问他们想要访问的内容.
We’ll store permissions flags inside the common 文件夹,因为业务逻辑可以与未来的模块共享. 我们从加an开始 enum 来持有一些权限标志 常见/中间件/常见.permissionflag.enum.ts:
export enum PermissionFlag {
    FREE_PERMISSION = 1,
    PAID_PERMISSION = 2,
    Another_paid_permission = 4,
    ADMIN_PERMISSION = 8,
    All_permissions = 2147483647,
}
注意:由于这是一个示例项目,因此我们保持旗标名称相当通用.
在我们忘记之前,现在是快速回到 addUser() 函数将临时幻数1替换为 PermissionFlag.FREE_PERMISSION. 我们还需要一个对应的 import statement.
我们也可以将它导入到一个新的中间件文件中 常见/中间件/常见.permission.middleware.ts 的单例类 CommonPermissionMiddleware:
从“express”中输入express;
导入{PermissionFlag}./common.permissionflag.enum';
从'debug'中导入debug;

const log: debug.IDebugger = debug('app:common-permission-middleware');
而不是创建几个类似的中间件函数,我们将使用 factory pattern to create a special factory method (or factory function or simply factory). 我们的工厂函数将允许我们在路由配置时生成中间件函数,以检查所需的任何权限标志. With that, 我们避免了在添加新的权限标志时手动复制中间件功能.
下面是一个工厂,它将生成一个中间件函数,检查我们传递给它的任何权限标志:
PermissionFlag required (requiredPermissionFlag: PermissionFlag) {
    return (
        req: express.Request,
        res: express.Response,
        next: express.NextFunction
    ) => {
        try {
            const userPermissionFlags = parseInt(
                res.locals.jwt.permissionFlags
            );
            如果(userPermissionFlags & requiredPermissionFlag) {
                next();
            } else {
                res.status(403).send();
            }
        } catch (e) {
            log(e);
        }
    };
}
更自定义的情况是,应该能够访问特定用户记录的唯一用户是相同的用户或管理员:
async onlySameUserOrAdminCanDoThisAction(
    req: express.Request,
    res: express.Response,
    next: express.NextFunction
) {
    const userPermissionFlags = parseInt(res.locals.jwt.permissionFlags);
    if (
        req.params &&
        req.params.userId &&
        req.params.userId === res.locals.jwt.userId
    ) {
        return next();
    } else {
        如果(userPermissionFlags & PermissionFlag.ADMIN_PERMISSION) {
            return next();
        } else {
            return res.status(403).send();
        }
    }
}
我们将添加最后一个中间件,这次是 users.middleware.ts:
异步userCantChangePermission (
    req: express.Request,
    res: express.Response,
    next: express.NextFunction
) {
    if (
        请求中的'permissionFlags'.body &&
        req.body.permissionFlags !== res.locals.user.permissionFlags
    ) {
        res.status(400).send({
            error:['用户不能更改权限标志'],
        });
    } else {
        next();
    }
}
And because the above function depends on res.locals.user,我们可以把这个值填充进去 validateUserExists() before the next() call:
// ...
if (user) {
    res.locals.user = user;
    next();
} else {
// ...
In fact, doing this in validateUserExists() 会使它变得不必要吗 validateSameEmailBelongToSameUser (). We can eliminate our database call there, 将其替换为我们可以指望被缓存的值 res.locals:
-        const user = await userService.getUserByEmail(req.body.email);
-        if (user && user.id === req.params.userId) {
+        if (res.locals.user._id === req.params.userId) {
现在我们准备将权限逻辑集成到 users.routes.config.ts.
First, we’ll import our new middleware and enum:
导入jwtMiddleware../auth/middleware/jwt.middleware';
导入permissionMiddleware../共同/中间件/常见.permission.middleware';
导入{PermissionFlag}../共同/中间件/常见.permissionflag.enum';
我们希望用户列表只能由具有管理权限的人提出的请求访问, 但我们仍然希望能够创建一个公开的新用户, 就像正常的用户体验期望流程一样. 让我们在控制器之前先使用工厂函数来限制用户列表:
this.app
    .route(`/users`)
    .get(
        jwtMiddleware.validJWTNeeded,
        permissionMiddleware.permissionFlagRequired (
            PermissionFlag.ADMIN_PERMISSION
        ),
        UsersController.listUsers
    )
// ...
Remember that the factory call here ((...)) 返回中间件函数-因此所有正常的,非工厂中间件被引用而不调用(()).
Another common restriction is that for all routes that include a userId,我们希望只有相同的用户或管理员具有访问权限:
             .路线(/用户/:userId)
-            .all(UsersMiddleware.validateUserExists)
+            .all(
+                UsersMiddleware.validateUserExists,
+                jwtMiddleware.validJWTNeeded,
+                permissionMiddleware.onlySameUserOrAdminCanDoThisAction
+            )
             .get(UsersController.getUserById)
我们还将阻止用户通过添加 UsersMiddleware.userCantChangePermission, just before the UsersController 函数引用在每个 PUT and PATCH routes.
但是让我们进一步假设我们的REST API业务逻辑只允许用户使用 PAID_PERMISSION 来更新他们的信息. 这可能与其他项目的业务需求一致,也可能不一致:这只是为了测试付费和免费许可之间的差异.
方法之后添加另一个生成器调用可以实现这一点 userCantChangePermission 我们刚刚添加的参考:
permissionMiddleware.permissionFlagRequired (
    PermissionFlag.PAID_PERMISSION
),
With that, we’re ready to restart Node.js and try it out.
为了测试路线,让我们试着 GET the users list without an access token:
curl——include——request GET 'localhost:3000/users' \
--header 'Content-Type: application/json'
我们收到一个HTTP 401响应,因为我们需要使用有效的JWT. 让我们尝试使用先前身份验证中的访问令牌:
curl——include——request GET 'localhost:3000/users' \
——header 'Content-Type: application/json' \
——header "Authorization: Bearer $REST_API_EXAMPLE_ACCESS"
这次我们得到一个HTTP 403. 我们的令牌是有效的,但是我们被禁止使用这个端点,因为我们没有 ADMIN_PERMISSION.
我们不需要它 GET 我们自己的用户记录:
curl——request GET“localhost:3000/users/$REST_API_EXAMPLE_ID”\
——header 'Content-Type: application/json' \
——header "Authorization: Bearer $REST_API_EXAMPLE_ACCESS"
The response:
{
    "_id": "UdgsQ0X1w",
    "email": "marcos.henrique@ngskmc-eis.net",
    "permissionFlags": 1,
    "__v": 0
}
In contrast, trying to update 我们自己的用户记录应该失败,因为我们的权限值是1 (FREE_PERMISSION only):
curl——include——request PATCH "localhost:3000/users/$REST_API_EXAMPLE_ID" \
——header 'Content-Type: application/json' \
——header "Authorization: Bearer $REST_API_EXAMPLE_ACCESS" \
--data-raw '{
    "firstName": "Marcos"
}'
响应如预期的那样是403.
作为读者练习,我推荐 changing the user permissionFlags at the local database and doing a new post to /auth 生成一个令牌 permissionFlags), then trying to PATCH the user again. 请记住,您需要将标志设置为其中一个的数值 PAID_PERMISSION or ALL_PERMISSIONS, since our business logic specifies that ADMIN_PERMISSION 它本身不能让你给其他用户甚至你自己打补丁.
对新岗位的要求是 /auth 提出了一个值得记住的安全方案. 例如,当站点所有者更改用户的权限时, 试图锁定行为不端的用户——直到下次刷新JWT时,用户才会看到此操作生效. 这是因为权限检查使用JWT数据本身来避免额外的数据库访问.
Auth0之类的服务可以通过提供自动令牌旋转来提供帮助, 但用户仍然会在旋转之间的时间体验到意想不到的应用行为, 不管这通常有多短. 为了缓解这种情况,开发人员必须积极地注意 revoke refresh tokens 响应权限更改.
在使用REST API时, 开发人员可以通过定期运行一堆cURL命令来防止潜在的错误. 但这是缓慢且容易出错的,而且很快就会变得乏味.
As an API grows, 维护软件质量变得很困难, 尤其是在业务逻辑频繁变化的情况下. 尽可能减少API错误,并自信地部署新的更改, 为应用的前端和/或后端设置测试套件是很常见的.
Rather than dive into 编写测试和可测试代码,我们将展示一些基本的机制,并为读者提供一个可用的测试套件.
在我们进行自动化之前,有必要考虑一下测试数据会发生什么.
我们使用Docker Compose来运行本地数据库, 期望使用此数据库进行开发, not as a live production data source. 我们将在这里运行的测试将影响本地数据库,因为每次运行时都会留下一组新的测试数据. 在大多数情况下,这应该不是一个问题,但如果是,我们留给读者改变的练习 docker-compose.yml 为测试目的创建一个新数据库.
在现实世界中,开发人员经常将自动化测试作为测试的一部分来运行 持续集成管道. To do that, 在管道级别配置一种为每个测试运行创建临时数据库的方法是有意义的.
我们将使用Mocha, Chai和SuperTest来创建我们的测试:
NPM I -save-dev chai mocha supertest @types/chai @types/express @types/mocha @types/supertest ts-node
Mocha将管理我们的应用程序并运行测试, Chai将允许更可读的测试表达式, 和SuperTest将通过像REST客户端那样调用我们的API来促进端到端(E2E)测试.
我们需要在 package.json:
"scripts": {
// ...
    "test": "mocha -r ts-node/register 'test/**/* ..test.ts '——unhandled-rejections =严格",
    "test-debug": "export DEBUG=* . && npm test"
},
这将允许我们在创建的文件夹中运行测试,该文件夹名为 test.
为了测试我们的测试基础设施,让我们创建一个文件, test/app.test.ts:
从'chai'导入{expect};
describe('Index Test', function () {
    it('should always pass', function () {
        expect(true).to.equal(true);
    });
});
这里的语法可能看起来不寻常,但它是正确的. We define tests by expect()ing behavior within it() blocks-我们指的是要传递给的函数体 it()——它们被称为内在 describe() blocks.
现在,在终端,我们将运行:
npm run test
We should see this:
> mocha -r ts-node/register 'test/**/*.test.ts '——unhandled-rejections =严格

  Index Test
    ✓ should always pass


  1 passing (6ms)
Great! 我们的测试库已经安装好,可以使用了.
保持测试输出干净, 我们希望在正常测试运行期间完全关闭Winston请求日志记录. 这就像快速更改非调试一样简单 else branch in app.ts to detect whether the it() 来自Mocha的函数存在:
if (!process.env.DEBUG) {
     loggerOptions.meta = false; // when not debugging, make terse
+    if (typeof global.it === 'function') {
+        loggerOptions.level = 'http'; // for non-debug test runs, squelch entirely
+    }
 }
我们需要添加的最后一个操作是导出我们的 app.ts 被我们的测试吞噬. At the end of app.ts, we’ll add export default just before server.listen(), because listen() returns our Node.js http.Server object.
With a quick npm run test 为了检查我们没有破坏堆栈,我们现在准备测试我们的API.
要开始配置我们的用户测试,让我们创建 test/users/users.test.ts,从需要的导入和测试变量开始:
import app from '../../app';
从'supertest'中导入supertest;
从'chai'导入{expect};
从'shortid'中导入shortid;
从'mongoose'输入猫鼬;

let firstUserIdTest = ''; // will later hold a value returned by our API
const firstUserBody = {
    email: `marcos.henrique+${shortid.generate()}@ngskmc-eis.net`,
    password: 'Sup3rSecret!23',
};

let accessToken = '';
let refreshToken = '';
const newFirstName = 'Jose';
const newFirstName2 = '保罗';
const newLastName2 = 'Faraco';
接下来,我们将创建一个最外层 describe() 带有一些setup和teardown定义的块:
描述('用户和认证端点',函数(){
    let request: supertest.SuperAgentTest;
    before(function () {
        request = supertest.agent(app);
    });
    After (function (done) {
        //关闭Express.然后,关闭我们的MongoDB连接
        //告诉Mocha我们完成了:
        app.close(() => {
            mongoose.connection.close(done);
        });
    });
});
我们传递给的函数 before() and after() 在所有测试之前和之后调用,我们将通过调用来定义 it() within the same describe() block. The function passed to after() takes a callback, done,我们确保只有在清理完应用程序及其数据库连接后才调用该函数.
Note: Without our after() 即使测试成功完成,摩卡也会被吊死. The advice is often to simply always call Mocha with --exit 为了避免这种情况,有一个(通常未被提及的)警告. 如果测试套件由于其他原因而挂起——比如测试套件中错误构建的承诺或应用程序本身——那么就挂起 --exit, Mocha不会等待,无论如何都会报告成功,这给调试增加了微妙的复杂性.
控件中添加单独的端到端测试 describe() block:
它('应该允许POST到/users', async函数(){
    Const res =等待请求.post('/users').send(firstUserBody);

    expect(res.status).to.equal(201);
    expect(res.body).not.to.be.empty;
    expect(res.body).to.be.an('object');
    expect(res.body.id).to.be.a('string');
    firstUserIdTest = res.body.id;
});
第一个函数将为我们创建一个新用户——一个惟一的用户, 由于我们的用户电子邮件是在使用 shortid. The request 变量包含一个SuperTest代理,允许我们向API发出HTTP请求. We make them using await,这就是为什么我们要传递的函数 it() has to be async. We then use expect() 从Chai测试各个方面的结果.
An npm run test 此时应该显示我们的新测试正在工作.
我们将添加以下所有内容 it() blocks inside our describe() block. 我们必须按照给出的顺序添加它们,这样它们才能处理我们正在改变的变量, such as firstUserIdTest.
它('应该允许POST到/auth', async函数(){
    Const res =等待请求.post('/auth').send(firstUserBody);
    expect(res.status).to.equal(201);
    expect(res.body).not.to.be.empty;
    expect(res.body).to.be.an('object');
    expect(res.body.accessToken).to.be.a('string');
    accessToken = res.body.accessToken;
    refreshToken = res.body.refreshToken;
});
这里我们为新创建的用户获取一个新的访问和刷新令牌.
它('应该允许从/users/:userId获取带有访问令牌的GET ', async函数(){
    Const res =等待请求
        .get(' /用户/ $ {firstUserIdTest}”)
        .set({Authorization: ' Bearer ${accessToken} '})
        .send();
    expect(res.status).to.equal(200);
    expect(res.body).not.to.be.empty;
    expect(res.body).to.be.an('object');
    expect(res.body._id).to.be.a('string');
    expect(res.body._id).to.平等(firstUserIdTest);
    expect(res.body.email).to.equal(firstUserBody.email);
});
这是一种象征 GET request to the :userId 路由来检查用户数据响应是否与我们最初发送的匹配.
In Mocha, it() 块也可以包含它们自己的 describe() 块,所以我们将把下一个测试嵌套在另一个测试中 describe() block. 这将使我们的依赖级联在测试输出中更加清晰,正如我们将在最后展示的那样.
描述('具有有效的访问令牌',函数(){
    它('应该允许从/users获取',async函数(){
        Const res =等待请求
            .get(`/users`)
            .set({Authorization: ' Bearer ${accessToken} '})
            .send();
        expect(res.status).to.equal(403);
    });
});
有效的测试不仅包括我们期望工作的内容,还包括我们期望失败的内容. 这里我们尝试列出所有用户,并期望得到403响应,因为我们的用户(具有默认权限)不允许使用该端点.
Within this new describe() block, we can continue writing tests. 因为我们已经讨论了其余测试代码中使用的特性, 它的起始点是 this line in the repo.
Mocha提供了一些在开发和调试测试时可以方便使用的功能:
.skip() 方法可用于避免运行单个测试或整个测试块. When it() is replaced with it.skip() (likewise for describe()), 有问题的测试将不会运行,但在Mocha的最终输出中将被计数为“pending”..only() 函数导致所有非-.only()-将测试标记为完全忽略,并且不会导致任何标记为“pending”.”mocha as defined in package.json can use --bail 作为命令行参数. 设置此选项后,只要有一个测试失败,Mocha就会停止运行测试. 这在我们的REST API示例项目中特别有用, since the tests are set up to cascade; if only the first test is broken, 摩卡正是这样报道的, 而不是抱怨所有依赖的(但没有损坏的)测试现在因为它而失败.如果我们现在用 npm run test我们会看到三个不合格的测试. (如果我们要让他们所依赖的功能暂时未实现, 这三个测试将是很好的候选 .skip().)
失败的测试依赖于我们的应用程序目前缺少的两个部分. The first is in users.routes.config.ts:
this.app.把(' /用户/:userId / permissionFlags: permissionFlags”,(
    jwtMiddleware.validJWTNeeded,
    permissionMiddleware.onlySameUserOrAdminCanDoThisAction,

    //注意:上面的两个中间件是必需的
    类中对它们的引用 .all() call, because that only covers
    // /users/:userId,而不是层次结构中它下面的任何东西

    permissionMiddleware.permissionFlagRequired (
        PermissionFlag.FREE_PERMISSION
    ),
    UsersController.updatePermissionFlags,
]);
The second file we need to update is users.controller.ts,因为我们只是引用了一个不存在的函数. We’ll need to add 导入{PatchUserDto}../dto/patch.user.dto'; 靠近顶部,以及类缺少的函数:
async updatePermissionFlags(req: express.Request, res: express.Response) {
    const patchUserDto: PatchUserDto = {
        permissionFlags:方法(点播.params.permissionFlags),
    };
    log(await usersService.patchById(req.body.id, patchUserDto));
    res.status(204).send();
}
添加这种特权升级功能对测试很有用,但并不适合大多数实际需求. 这里有两个练习给读者:
permissionFlags 同时仍然允许测试受权限限制的端点.permissionFlags should 能够通过API进行更改. (这里有一个先有鸡还是先有蛋的难题:一个特定的用户首先是如何获得更改权限的权限的?)With that, npm run test 现在应该可以成功地输出如下格式的输出:
  Index Test
    ✓ should always pass

  用户和认证端点
    ✓ should allow a POST to /users (76ms)
    应该允许POST到/验证
    ✓应该允许来自/users/:userId的带有访问令牌的GET
    使用有效的访问令牌
      应该允许从/用户获取
      应该禁止对/users/:userId进行PATCH
      应该禁止对/users/:userId执行一个不存在的ID的PUT操作
      应禁止对/users/:userId进行PUT操作,试图更改权限标志
      ✓应该允许PUT到/users/:userId/permissionFlags/2进行测试
      使用新的权限级别
        应该允许POST /auth/refresh-token
        应该允许对/users/:userId进行PUT操作来修改姓和名
        ✓应该允许从/users/:userId获取,并且应该有一个新的全名
        ✓应该允许从/users/:userId中执行DELETE操作


  13 passing (231ms)
现在我们有了一种快速验证REST API是否按预期工作的方法.
面对意外测试失败的开发人员可以轻松地利用Winston和Node.. Js的调试模块.
例如,很容易关注通过调用来执行哪些Mongoose查询 调试=mquery npm运行测试. (注意这个命令缺少 export prefix and && 在中间,这将使环境持久化到以后的命令.)
这也是可以展示的 all debug output with npm run test-debug, thanks to our earlier addition to package.json.
With that, we have a working, scalable, mongodb支持的REST API, with a convenient automated test suite. But it’s still missing some essentials.
使用Express时.Js的文档是必读的,尤其是它的 安全最佳实践. 至少,这是值得追求的。
npm audit or go deeper with snyk)最后一点可以直接添加到我们的示例项目中:
npm i --save helmet
Then, in app.ts, we need only import it and add another app.use() call:
从'helmet'中导入头盔;
// ...
app.use(helmet());
As its docs point out, 头盔(就像任何安全装置一样)并不是万能的, but every bit of prevention does help.
在这个系列中,我们没有深入 Docker containers 但我们确实在Docker Compose的容器中使用了MongoDB. 不熟悉Docker但想进一步尝试的读者可以创建一个名为 Dockerfile (with no extension) in the project root:
FROM node:14-slim

执行mkdir -p /usr/src/app

WORKDIR /usr/src/app

COPY . .

RUN npm install

EXPOSE 3000

CMD ["node", "./dist/app.js"]
这个配置从 node:14-slim official image 并在容器中构建和运行我们的示例REST API. 配置可以因情况而异, 但是这些看起来通用的默认值适用于我们的项目.
要构建映像,我们只需在项目根目录下运行此命令(替换 tag_your_image_here as desired):
docker build . -t tag_your_image_here
然后,运行后端程序的一种方法是——假设使用完全相同的文本替换——
Docker运行-p 3000:3000 tag_your_image_here
此时,MongoDB和Node.js都可以使用Docker,但我们必须以两种不同的方式启动它们. 我们把添加主节点留给读者作为练习.js app to docker-compose.yml 所以整个应用程序可以用一个 docker-compose command.
In this article, 我们对REST API进行了广泛的改进:我们添加了一个容器化的MongoDB, configured Mongoose and express-validator, 添加了基于jwt的身份验证和灵活的权限系统, and wrote a battery of automated tests.
这对于新手和高级后端开发人员来说都是一个坚实的起点. 然而,在某些方面,我们的项目可能不适合生产使用、扩展和维护. 除了我们在本文中穿插的读者练习之外,还有什么可以学习的呢?
在API级别,我们建议仔细阅读如何创建 OpenAPI兼容的规范. 对追求企业发展特别感兴趣的读者也可以尝试一下 NestJS. 它是建立在Express之上的另一个框架.js, 但是它更加健壮和抽象——这就是为什么最好使用我们的示例项目来熟悉Express.js basics first. No less important, the GraphQL api的方法作为REST的替代方案具有广泛的吸引力.
当涉及到权限, 我们介绍了一种使用中间件生成器手动定义标志的按位标志方法. 为了进一步方便扩展,值得研究CASL库,它 与Mongoose集成. It extends the flexibility of our approach, 允许对特定标志应该允许的能力进行简洁的定义, like 可以(“更新”,“删除”,“(型号名称)”,{创造者:‘我’}); 代替整个自定义中间件功能.
我们在这个项目中提供了一个实用的自动化测试跳板, 但是一些重要的话题超出了我们的范围. 我们建议读者:
PATCH to /users/:userId.expect interface from Chai, but it also supports should() and assert. 其他测试库也值得学习,比如 Jest.除了这些主题,我们的Node.js/TypeScript的REST API已经准备好了. Particularly, 读者可能希望实现更多中间件,以围绕标准用户资源强制执行公共业务逻辑. 这里我就不深入讲了, 但我很乐意为那些发现自己被屏蔽的读者提供指导和建议——请在下面留言.
这个项目的完整代码是开源的 GitHub repo.
Not quite. Mongoose是一个对象数据/文档建模(ODM)库. 它提供了一个直接的基于模式的解决方案,在底层使用本机MongoDB驱动程序.
作为一个文档数据库,MongoDB允许快速开发和易于扩展.
The name MongoDB came from “humongous,,因为它的扩展能力,也因为该公司计划对MongoDB的全球使用产生巨大影响.
JWT来自RFC标准(RFC 7519),描述了JSON结构与自包含加密的使用. 基于jwt的身份验证可用于通过可由服务器验证的秘密令牌以安全的方式管理请求.
JWT包含标头、有效负载和签名. 签名包含一个用模式编码的秘密. 另一方(服务器)知道这个秘密, 它可以通过解密和验证签名来验证有效负载.
与测试库/框架,如Mocha, Cypress, and SuperTest, 开发人员可以模拟应用程序的使用情况并验证预期的响应. 自动化后端测试的范围从单元测试(单个类)到集成测试(多个类)再到端到端(E2E)测试(使用真实的HTTP调用).
自动化测试的目的是在进一步推进代码之前(例如向其他团队成员或实时产品)提供一种检测问题的方法。. 它还通过避免手工测试减少了测试时间和工作量.
Automated testing is definitely worth it! Companies like Google, Amazon, Facebook, Apple, 如果没有自动化测试,微软也不可能有这么大的规模. 但即使是最小的应用程序也受益于自动化测试带来的更短的开发周期和更高的可靠性.
Marcos has 17+ years in IT and development. 他的爱好包括REST架构、敏捷开发方法和JS.
 作者都是各自领域经过审查的专家,并撰写他们有经验的主题. 我们所有的内容都经过同行评审,并由同一领域的Toptal专家验证.
12
World-class articles, delivered weekly.
World-class articles, delivered weekly.
Join the Toptal® community.
