
Dacian Florea
Verified Expert in Engineering
Dacian是一位资深的全栈移动应用程序开发人员, a Flutter expert, 也是Flutter框架的贡献者. 他帮助世界各地的公司设计和实施高质量的软件解决方案,并提供出色的用户体验.
Dacian是一位资深的全栈移动应用程序开发人员, a Flutter expert, 也是Flutter框架的贡献者. 他帮助世界各地的公司设计和实施高质量的软件解决方案,并提供出色的用户体验.
对Flutter的兴趣正在下降 all-time high而且早就该这么做了. 谷歌的开源SDK兼容 Android、iOS、macOS、web、Windows等 Linux. 一个Flutter代码库就可以支持所有这些功能. 单元测试在交付一致和可靠的产品方面很有帮助 Flutter App,通过先发制人的改进来防止错误、缺陷和缺陷 quality of code 在组装之前.
在这个颤振测试教程中, 我们分享了颤振单元测试的工作流程优化, 演示一个基本的颤振单元测试示例, 然后转到更复杂的Flutter测试用例和库.
我们在Flutter中实现单元测试的方式与在其他技术栈中实现单元测试的方式大致相同:
为了演示如何进行颤振测试,我准备了一个 样本颤振项目 鼓励大家使用And test the code at your leisure. 该项目使用 external API 获取并显示我们可以按国家过滤的大学列表.
关于Flutter如何工作的一些注意事项:该框架通过自动加载 flutter_test library 创建项目时. 该库使Flutter能够读取、运行和分析单元测试. Flutter也会自动创建 test 用于存储测试的文件夹. 方法的重命名和/或移动是至关重要的 test 文件夹,因为这会破坏它的功能,从而破坏我们运行测试的能力. 它也必须包含 _test.dart 在我们的测试文件名中,因为这个后缀是Flutter识别测试文件的方式.
为了促进项目中的单元测试,我们实现了 具有干净架构的MVVM and 依赖注入(DI),如为源代码子文件夹选择的名称所示. The combination of MVVM 和DI原则确保了关注点的分离:
我们将为将要编写的测试文件创建一个有组织的存储空间, 在这个系统中,一组测试将有容易识别的“家”."鉴于Flutter要求将测试定位在 test 文件夹,让我们在下面镜像源代码的文件夹结构 test. Then, 当我们编写测试时, 我们会把它放在合适的子文件夹里:就像干净的袜子放在梳妆台的袜子抽屉里,叠好的衬衫放在衬衫抽屉里一样, unit tests of Model 类放在名为 model, for example.

采用这个文件系统可以在项目中建立透明度,并为团队提供一种查看代码的哪些部分具有相关测试的简单方法.
现在我们准备将单元测试付诸行动.
我们从 model classes (in the data 层),并将我们的示例限制为只包含一个 model class, ApiUniversityModel. 这个类有两个功能:
Map.University data model.为了测试模型的每个功能,我们将定制前面描述的通用步骤:
在评估了我们的代码之后, 我们已经准备好完成第二个目标:设置特定于的两个函数的数据模拟 ApiUniversityModel class.
来模拟第一个函数(通过模拟JSON来初始化模型) Map), fromJson, we’ll create two Map 对象来模拟函数的输入数据. 我们也会创建两个等价的 ApiUniversityModel 对象来表示使用所提供的输入的函数的预期结果.
要模拟第二个函数(构建 University data model), toDomain, we’ll create two University 对象,这是在先前实例化的对象中运行此函数后的预期结果 ApiUniversityModel objects:
void main() {
    Map apiUniversityOneAsJson = {
        “alpha_two_code”:“我们”,
        “域”:[" marywood.edu"],
        “国家”:“美国”;
        “状态省”:空,
        “web_pages”:[" http://www.marywood.edu"],
        "name": "Marywood University"
    };
    ApiUniversityModel expectedApiUniversityOne = ApiUniversityModel(
        alphaCode: "US",
        国家:“美国”;
        state: null,
        校名:“玛丽伍德大学”
        [" http://www网站:.marywood.edu"],
        域:[" marywood.edu"],
    );
    期望就读的大学
        alphaCode: "US",
        国家:“美国”;
        state: "",
        校名:“玛丽伍德大学”
        [" http://www网站:.marywood.edu"],
        域:[" marywood.edu"],
    );

    Map apiUniversityTwoAsJson = {
        “alpha_two_code”:“我们”,
        “域”:[" lindenwood.edu"],
        “国家”:“美国”;
        “状态省”:“乔丹”,
        "web_pages": null,
        "name": "Lindenwood University"
    };
    ApiUniversityModel expectedApiUniversityTwo = ApiUniversityModel(
        alphaCode: "US",
        国家:“美国”;
        state:"MJ",
        校名:林登伍德大学
        websites: null,
        域:[" lindenwood.edu"],
    );
    期望就读的大学
        alphaCode: "US",
        国家:“美国”;
        state: "MJ",
        校名:林登伍德大学
        websites: [],
        域:[" lindenwood.edu"],
    );
}
Next, 我们的第三和第四个目标, 我们将添加描述性语言来定义我们的测试组和测试函数签名:
    void main() {
    //之前的声明
        group("Test ApiUniversityModel initialization from JSON", () {
            test(' test using json one', () {});
            test(' test using json two', () {});
        });
        group("Test ApiUniversityModel toDomain", () {
            test(' test toDomain using json one', () {});
            test(' test toDomain using json two', () {});
        });
}
我们定义了两个测试的签名来检查 fromJson 函数,以及两个检查 toDomain function.
要实现第五个目标并编写测试,让我们使用 flutter_test图书馆’s expect 将函数结果与我们的期望进行比较的方法:
void main() {
    //之前的声明
        group("Test ApiUniversityModel initialization from json", () {
            test(' test using json one', () {
                期望(ApiUniversityModel.fromJson (apiUniversityOneAsJson),
                    expectedApiUniversityOne);
            });
            test(' test using json two', () {
                期望(ApiUniversityModel.fromJson (apiUniversityTwoAsJson),
                    expectedApiUniversityTwo);
            });
        });

        group("Test ApiUniversityModel toDomain", () {
            test(' test toDomain using json one', () {
                期望(ApiUniversityModel.fromJson (apiUniversityOneAsJson).toDomain(),
                    expectedUniversityOne);
            });
            test(' test toDomain using json two', () {
                期望(ApiUniversityModel.fromJson (apiUniversityTwoAsJson).toDomain(),
                    expectedUniversityTwo);
            });
        });
}
完成了五个目标之后,我们现在可以从IDE或从 command line.
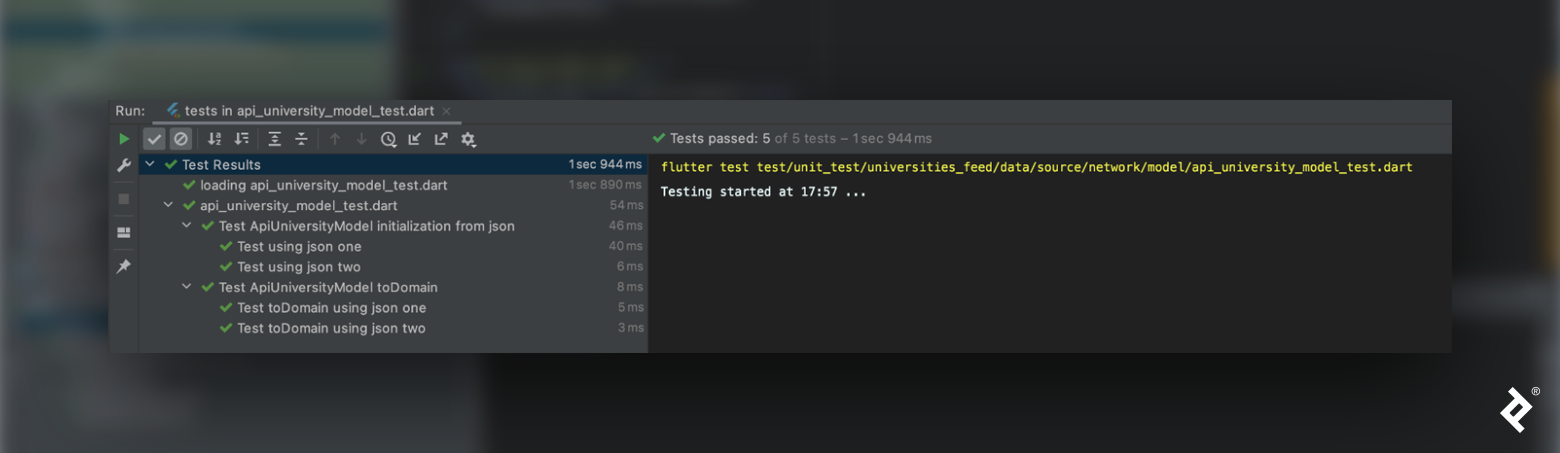
中包含的所有测试都可以在终端上运行 test 文件夹中输入 flutter test 命令,确保我们的测试通过.
或者,我们可以通过输入。来运行单个测试或测试组 颤振试验—纯名称“ReplaceWithName” 命令,将我们的测试或测试组的名称替换为 ReplaceWithName.
完成了一个没有依赖项的简单测试, 让我们探索一个更有趣的Flutter单元测试示例:我们将测试 endpoint class,其范围包括:
在对代码求值之后,我们将使用 flutter_test图书馆’s setUp 方法初始化测试组中的类:
group(“测试大学端点API调用”,(){
    setUp(() {
        baseUrl = "http://test.url";
        dioClient = Dio(BaseOptions());
        endpoint = UniversityEndpoint(dioClient, baseUrl: baseUrl);
    });
}
要向api发出网络请求,我更喜欢使用 retrofit library,它生成大部分必需的代码. 要正确测试 UniversityEndpoint 同学们,我们将强制 dio library—which Retrofit 方法来执行API调用,从而返回所需的结果 Dio 类的行为通过自定义响应适配器.
嘲笑是可能的,因为我们已经建立了 UniversityEndpoint class through DI. (If the UniversityEndpoint 类初始化 Dio 类本身,我们将无法模拟类的行为.)
为了嘲弄 Dio 类的行为,我们需要知道 Dio 方法中使用的 Retrofit 图书馆——但我们不能直接进入 Dio. 因此,我们将嘲笑 Dio 使用自定义网络响应拦截器:
类DioMockResponsesAdapter扩展HttpClientAdapter {
  最后的MockAdapterInterceptor拦截器;

  DioMockResponsesAdapter(这.interceptor);

  @override
  无效关闭({bool force = false}) {}

  @override
  Future fetch(RequestOptions options,
      Stream? requestStream,未来? cancelFuture) {
    if (options.方法==拦截器.type.name.toUpperCase() &&
        options.baseUrl ==拦截器.uri &&
        options.queryParameters.hasSameElementsAs(拦截器.query) &&
        options.path == interceptor.path) {
      return Future.value(ResponseBody.fromString(
        jsonEncode(拦截器.serializableResponse),
        interceptor.responseCode,
        headers: {
          “内容类型”:[" application / json ")
        },
      ));
    }
    return Future.value(ResponseBody.fromString(
        jsonEncode(
              {"error": "请求与模拟拦截器细节不匹配!"}),
        -1,
        statusMessage: "请求与模拟拦截器细节不匹配!"));
  }
}

enum请求类型{GET、POST、PUT、PATCH、DELETE}

MockAdapterInterceptor {
  最后的RequestType类型;
  final String uri;
  final String path;
  final Map query;
  最终对象serializable响应;
  int responseCode;

  MockAdapterInterceptor(这.type, this.uri, this.path, this.query,
      this.serializableResponse,这.responseCode);
}
现在我们已经创建了拦截器来模拟我们的网络响应, 我们可以定义我们的测试组和测试函数签名.
在本例中,我们只有一个函数要测试(getUniversitiesByCountry),所以我们只创建一个测试组. 我们将测试函数对三种情况的响应:
Dio 类实际调用的函数 getUniversitiesByCountry?下面是我们的测试组和测试函数签名:
  group(“测试大学端点API调用”,(){

    test('测试端点调用dio', () async {});

    test('测试端点返回错误',()async {});

    test('测试端点调用并返回2个有效的大学',()async {});
  });
我们已经准备好编写测试了. 对于每个测试用例,我们将创建的实例 DioMockResponsesAdapter 具有相应的配置:
group(“测试大学端点API调用”,(){
    setUp(() {
        baseUrl = "http://test.url";
        dioClient = Dio(BaseOptions());
        endpoint = UniversityEndpoint(dioClient, baseUrl: baseUrl);
    });

    test('测试端点调用dio', () async {
        dioClient.httpClientAdapter = _createMockAdapterForSearchRequest(
            200,
            [],
        );
        Var结果=等待端点.getUniversitiesByCountry(“我们”);
        expect(result, []);
    });

    test('测试端点返回错误',()async {
        dioClient.httpClientAdapter = _createMockAdapterForSearchRequest(
            404,
            {"error": "Not found .!"},
        );
        List? response;
        DioError? error;
        try {
            响应=等待端点.getUniversitiesByCountry(“我们”);
        } on DioError catch (DioError, _) {
            error = dioError;
        }
        期望(响应,null);
        expect(error?.error, "Http状态错误[404]");
    });

    test('测试端点调用并返回2个有效大学',()async {
        dioClient.httpClientAdapter = _createMockAdapterForSearchRequest(
            200,
            generateTwoValidUniversities (),
        );
        Var结果=等待端点.getUniversitiesByCountry(“我们”);
        期望(因此,expectedTwoValidUniversities ());
    });
});
现在端点测试已经完成,让我们测试数据源类, UniversityRemoteDataSource. 早些时候,我们观察到 UniversityEndpoint 类是构造函数的一部分 UniversityRemoteDataSource ({UniversityEndpoint? universityEndpoint}),这表明 UniversityRemoteDataSource uses the UniversityEndpoint 类来完成它的作用域,所以这就是我们要模拟的类.
在前面的示例中,我们手动模拟了 Dio 使用自定义的客户端请求适配器 NetworkInterceptor. 我们这是在嘲笑全班同学. 手动模拟类及其函数会非常耗时. Fortunately, 模拟库就是为处理这种情况而设计的,并且可以以最小的工作量生成模拟类. Let’s use the mockito library在Flutter中用于mock的行业标准库.
To mock through Mockito,我们首先添加注释@GenerateMocks ([class_1, class_2,…),在测试代码之前——就在 void main() {} function. 在注释中,我们将包含一个类名列表作为参数(代替 class_1,class_2…).
接下来,我们运行Flutter 's Flutter pub运行build_runner构建 命令,该命令在与测试相同的目录中为模拟类生成代码. 生成的模拟文件名将是测试文件名加上的组合 .mocks.dart,替换测试 .dart suffix. 文件的内容将包括名称以前缀开头的模拟类 Mock. For example, UniversityEndpoint becomes MockUniversityEndpoint.
Now, we import university_remote_data_source_test.dart.mocks.dart (我们的模拟文件)放入 university_remote_data_source_test.dart (the test file).
Then, in the setUp 函数,我们将进行模拟 UniversityEndpoint by using MockUniversityEndpoint 初始化 UniversityRemoteDataSource class:
进口的university_remote_data_source_test.mocks.dart';

@GenerateMocks ([UniversityEndpoint])
void main() {
    晚期UniversityEndpoint端点;
    remotedatasource

    group(“测试函数调用”,(){
        setUp(() {
            endpoint = MockUniversityEndpoint();
            dataSource = UniversityRemoteDataSource(universityEndpoint: endpoint);
        });
}
我们成功地 UniversityEndpoint 然后初始化 UniversityRemoteDataSource class. 现在我们可以定义测试组和测试函数签名了:
group(“测试函数调用”,(){

  test('测试数据源从端点调用getUniversitiesByCountry ', () {});

  test('测试数据源映射getUniversitiesByCountry响应到流',(){});

  test('测试数据源映射getUniversitiesByCountry响应到有错误的流',(){});
});
这样,我们的模拟、测试组和测试函数签名就设置好了. 我们已经准备好编写实际的测试了.
我们的第一个测试检查 UniversityEndpoint 函数在数据源初始化获取国家/地区信息时调用. 我们首先定义每个类在调用其函数时的反应. 既然我们嘲笑 UniversityEndpoint 类,这是我们要用到的类,使用 当(function_that_will_be_called).然后(what_will_be_returned) code structure.
我们正在测试的函数是异步的(返回a Future 对象),所以我们将使用 when(function name).然后回答((_){修改后的函数结果}) 代码结构来修改我们的结果.
要检查 getUniversitiesByCountry function calls the getUniversitiesByCountry 内部的功能 UniversityEndpoint class, we’ll use when(...).thenAnswer( (_) {...} ) to mock the getUniversitiesByCountry 内部的功能 UniversityEndpoint class:
when(endpoint.getUniversitiesByCountry(“测试”))
    .thenAnswer((realInvocation) => Future.value([]));
现在我们已经模拟了响应,我们调用数据源函数并检查——使用 verify function-whether的 UniversityEndpoint 函数被调用:
test('测试数据源从端点调用getUniversitiesByCountry ', () {
    when(endpoint.getUniversitiesByCountry(“测试”))
        .thenAnswer((realInvocation) => Future.value([]));

    dataSource.getUniversitiesByCountry(“测试”);
    verify(endpoint.getUniversitiesByCountry(“测试”));
});
我们可以使用相同的原则编写额外的测试,检查函数是否正确地将端点结果转换为相关的数据流:
进口的university_remote_data_source_test.mocks.dart';

@GenerateMocks ([UniversityEndpoint])
void main() {
    晚期UniversityEndpoint端点;
    remotedatasource

    group(“测试函数调用”,(){
        setUp(() {
            endpoint = MockUniversityEndpoint();
            dataSource = UniversityRemoteDataSource(universityEndpoint: endpoint);
        });

        test('测试数据源从端点调用getUniversitiesByCountry ', () {
            when(endpoint.getUniversitiesByCountry(“测试”))
                    .thenAnswer((realInvocation) => Future.value([]));

            dataSource.getUniversitiesByCountry(“测试”);
            verify(endpoint.getUniversitiesByCountry(“测试”));
        });

        test('测试数据源映射getUniversitiesByCountry对流的响应',
                () {
            when(endpoint.getUniversitiesByCountry(“测试”))
                    .thenAnswer((realInvocation) => Future.value([]));

            expect(
                dataSource.getUniversitiesByCountry(“测试”),
                emitsInOrder([
                    const AppResult>.loading(),
                    const AppResult>.data([])
                ]),
            );
        });

        test(
                '测试数据源映射getUniversitiesByCountry响应到错误的流',
                () {
            mockApiError = ApiError(
                statusCode: 400,
                message: "error",
                errors: null,
            );
            when(endpoint.getUniversitiesByCountry(“测试”))
                    .thenAnswer((realInvocation) => Future.错误(mockApiError));

            expect(
                dataSource.getUniversitiesByCountry(“测试”),
                emitsInOrder([
                    const AppResult>.loading(),
                    AppResult>.apiError (mockApiError)
                ]),
            );
        });
    });
}
我们已经执行了大量的Flutter单元测试,并演示了不同的模拟方法. 我邀请你继续使用我的 样本颤振项目 运行额外的测试.
如果您已经将单元测试合并到您的Flutter项目中, 本文可能介绍了一些您可以注入到工作流中的新选项. In this tutorial, 我们演示了在您的软件中使用单元测试最佳实践是多么简单 下一个Flutter项目 以及如何应对更微妙的测试场景的挑战. 您可能再也不想跳过Flutter中的单元测试了.
Toptal工程博客的编辑团队向 Matija Bečirević 感谢Paul Hoskins审阅了本文中的代码示例和其他技术内容.
在Flutter中进行单元测试的过程与在大多数框架中一样. 在定义了要测试的类和函数(测试用例)之后, (1)对规范进行评估, (2)建立数据模拟, (3)确定测试组, (4)定义每个测试组的测试功能签名, (5)编写并运行测试.
单元测试可以防止或大大减少应用程序中的错误, 在应用首次发布时就提供高质量的用户体验. 一个额外的好处是:阅读单元测试可以帮助新开发人员学习和理解代码.
MVVM(模型-视图-视图模型模式)增强了代码库的稳定性和可伸缩性. 代码增强是我们编写更干净的代码以符合MVVM的架构需求的自然结果.
MVVM架构模块化了我们的代码:Model模块中的类提供我们的数据. View模块通过UI小部件呈现数据. Lastly, the ViewModel 类获取数据并向其关联的类提供数据 View classes.
单元测试是测试单个代码片段的过程, 通常是非常小的代码单元,比如类, methods, and functions.
Located in Bucharest, Romania
Member since November 9, 2020
Dacian是一位资深的全栈移动应用程序开发人员, a Flutter expert, 也是Flutter框架的贡献者. 他帮助世界各地的公司设计和实施高质量的软件解决方案,并提供出色的用户体验.
 作者都是各自领域经过审查的专家,并撰写他们有经验的主题. 我们所有的内容都经过同行评审,并由同一领域的Toptal专家验证.
6
世界级的文章,每周发一次.
世界级的文章,每周发一次.
Join the Toptal® community.
